-
Measuring distances on images:
- Set scale as described above
- Place "measure wand" on edge of landform
- Depress mouse button and hold down while dragging to other edge of landform
- While holding mouse button down, read length value in Info box.
- Release mouse button
-
Measuring areas of landforms:
- Set scale as described above
- Check "area" box in the ANALYZE - Options menu
- Select "Freehand tool" in toolbox
- Depress mouse button while tracing perimeter of landform
- Select Analyze - Measure
- Read "area" value in Info box
Setting Scales
Setting the scale on a MDIM Viking Image is fairly easy. A digital image map file starts with the letter "M" and is followed by another letter denoting the resolution code of the image. The table below lists the resolution codes used as well as the actu al resolutions in degrees/pixel and in kilometers/pixel. It is the corresponding resolution in kilometers/pixel that will be used to set the scale.
| RESOLUTION CODE | DEGREES/PIXEL | KILOMETERS/PIXEL |
|---|---|---|
| C | 1/4 | 14.77 |
| E | 1/16 | 3.69 |
| G | 1/64 | 0.943 |
| I | 1/256 | 0.231 |
The first step is to select the "measure wand" in the toolbox as highlighted below. Measure a prominent landform such as a crater rim, by placing the mouse on the left side of the rim as in the example, depressing the mouse button, dragging the mouse acr
oss the diameter of the crater rim and releasing the mouse button.
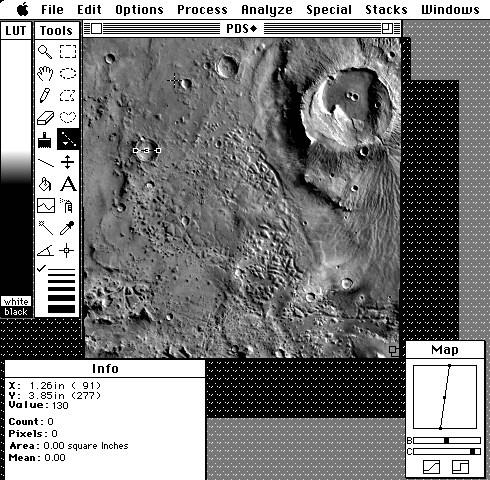
Select ANALYZE - SET SCALE option in the menu or
double-click on the "measure wand" in the toolbox. A dialog box will
then appear as is shown below.
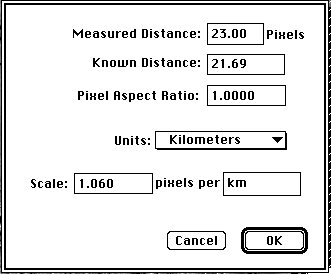
Notice that the top line in the dialog box has the "Measured Distance" in number of pixels of the straight line segment corresponding to the diameter of the crater rim. First, change the units to "kilometers" in the "Units:" box. Now we need to comput
e the length of the line in kilometers. We do this by multiplying the "Measured Distance" in pixels (23.00 in our example) by the resolution in kilometers/pixels. In this image, the resolution code is "G", so the resolution is 0.943 kilometers/pixel.
The product of these two numbers is 21.69 and we enter this number in the "Known Distance" box. Your number will be different for each image. Leave the "Pixel Aspect Ratio" at 1.000 . Select the "OK" button.
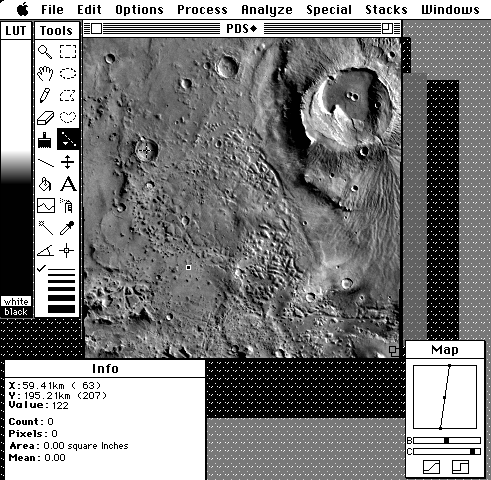
As shown in the figure below, the "X" and "Y" coordinates in the Info box now are in units of kilometers. These "X" and "Y" coordinates show the distance from the lower left corner of the image which is set at X = 0km and Y = 0km. The numbers to
the right of these coordinates in parenthesis denote the distance away from the lower left corner of the image in number of pixels. You are now ready to measure distances on the image.
Measuring Distances on the Image
After you have set the scale, it is easy to measure distances. In this example, we will determine the diameter of the caldera of the volcano, Apollinaris Patera. First, place the mouse on the edge of the caldera as shown in the figure below and depress the mouse button. While holding the mouse button down, drag the pointer to the other edge of the landform. Notice that "length" now appears in the Info box. Once you let go of the mouse button, the length measurement will disappear, so be sure to write the distance down if you want to save it.

Measuring Areas of Landforms
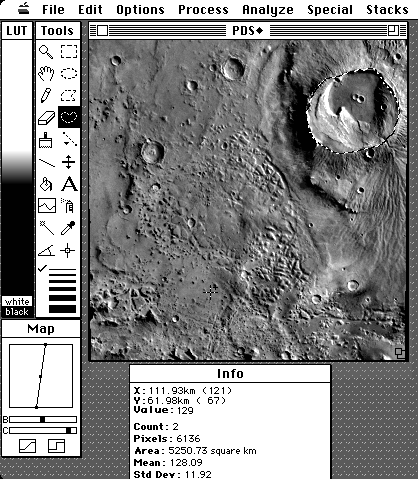
To measure the area of a landform, first make sure that the "area" box is checked in the ANALYZE - Options menu. If the scale has already been set in the ANALYZE - Set Scale menu as in the above example, the area will be given
in units of square kilometers in the Info box. As shown in the example below, select the "Freehand tool" which is located just above the "Measure Wand" in the toolbox to trace the perimeter of the caldera. Select Analyze - Measure a
nd the area of the caldera will then appear in the Info box in square kilometers.
[Contents] [Next]
![]()