
 From the Hubble Space
Telescope
From the Hubble Space
Telescope


Show students some of the stunning HST color images, such as those of M-16, the Eagle Nebula (which also appears on the poster co-packaged with this Guide.) Ask the students if they realize that the HST can only "see" in black and white. Ask them how they think such color images are created.
Materials (for each team: color filters may need to be shared)
 /
/

Explain that scientists use computers to create color images from HST and other spacecraft by combining information from several black and white images taken through different colored filters. Explain that this is because objects reveal different aspects of their surfaces through filters of different colors. In this Activity, students will be able to explore this phenomenon for themselves, and then deduce the "real" colors of a hypothetical planet, working only from black and white images-just like NASA's computers. (To repeat, the planet is hypothetical and, for clarity's sake, composed only of primary colors but the same principles and procedures apply to any image of any color or hue.)
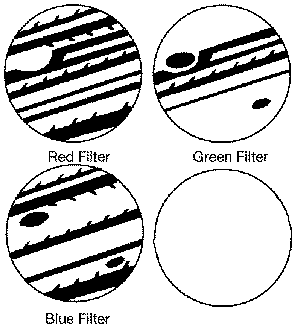
When students have completed their charts, distribute red, green and blue marking pens. Explain that these show three images of the same simplified and hypothetical planet. All the images are black and white, but each appears as if taken through the different color filters, as indicated. Using marking pens and their chart as a guide, ask students to study the three black and white images carefully, and then draw an image in color showing what they think the planet really looks like. When they are done, show students the correct answer you have prepared in advance, and guide them to appreciate the reasons why.

Have students apply the principles of this Activity to create "Hidden Messages" which can only be detected using filters of the appropriate color.
Normal sunlight and most classroom lighting is "white light," meaning it contains all colors of the spectrum. Opaque objects appear the color they do when illuminated by white light because their surfaces scatter only certain colors back into our eyes. A white object appears white because it scatters all the colors which together make white light. A pure black object appears black because its surface absorbs all the light which falls on it and scatters none of it back into our eyes. An object looks red because it scatters only the red rays in white light back into our eyes.
Colored filters only allow light of their particular color to pass through. Thus a red filter only allows red light to pass through; a green filter only green light. So a white object (which scatters all colors of light), will look the color of whatever filter it is seen through: red through a red filter, green through a green filter. A black object scatters no light, so it will look black through any color filter. A red object will look red through a red filter, but black (or gray) through a green or blue filter, because the object only gives off red light. Similarly, a green object will look green through a green filter, but black (or gray) through a red or blue filter. A blue object will look blue through a blue filter but black (or gray) through a red or green filter.
Note: depending on the exact color of red, blue and green in the images you use, and the exact color of the markers, crayons or pencils available to students, you will get more or less the "ideal" results described above. A red object through the blue filter may appear gray rather than pure black, but students should still be able to grasp the basic principles.
Use Crayola Crayons (24 pack, UPC# 7166200024): cerulean blue, red and green with the co-packaged blue filter.
Use Magic Marker Presentation Plus (6 marker pack, UPC# 71662 00747): red, green, and blue markers with the co-packaged red and green filters.
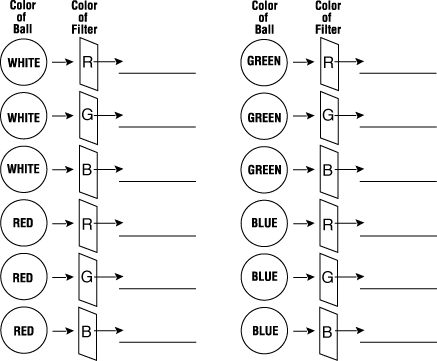
Study the diagram below. Each shows light from objects of a different color passing through different-colored filters. Apply what you learned from your "eyes-on" experiment, and fill in the blank space with the color which you think passes through the filter. This is the color the object will appear if it's seen through that filter. If you think that no color would pass through, write "none." This means the object would look black through that filter.
Below are three black and white images of a hypothetical planet. Each simulated image appears as if it was taken through the different color filter noted under the image. Examine these images carefully and applying the rules you generated, figure out the real colors of the planet's features. Using colored pens or markers, create a color drawing of the planet in the blank circle below.
 Your planet to color
Diagram of Color Filters Excercise.
FILTER COLOR
SAMPLE  	     RED     GREEN	BLUE
            	 ________________________
White		|________|________|________|
Black 		|________|________|________|
Red   		|________|________|________|
Green		|________|________|________|
Blue 		|________|________|________|

R	= Red
G	= Green
B 	= Blue
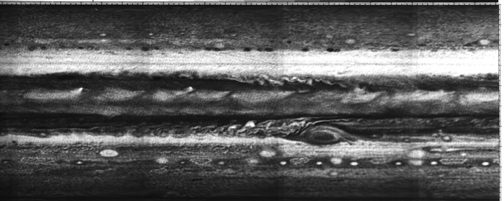
Arrange masters as follows:

(Great Red Spot) GRS
Image #1 January 6, 1979 at 13.4 hours* Image #2 January 8, 1979 at 5.1 hours* Image #3 January 27, 1979 at 15.6 hours* *Time given in Universal Time
Materials
(All to be found on the copy masters provided)
This material is provided in a separate directory as high resolution .TIFF files - they are very big, and take a long time to download. Masters Directory.
/
Explain that through the use of orbiting satellites and spacecraft, we are now able to see the weather over the entire Earth as well on other planets. Several satellites over the Earth's equator send us images every hour for a constant record of the Earth's weather. Other spacecraft like the two Voyager probes to the outer planets took images of the atmospheres of those remote worlds as they flew past in the 1970's and 1980's. But these images were all taken over brief periods of time, as if the newspaper printed a satellite image of Earth today, and no more for decades! The Hubble Space Telescope can image the weather of other worlds over time, looking for changes. It's for that reason that some call the Hubble an "interplanetary weather satellite."
Spacecraft cameras only take still images, but sequential images can be edited together by computer so we can see the weather in motion, as you typically see on the TV weather report, or in some of the dynamic images of Jupiter which Dr. Reta Beebe showed during LHST Program 1, "The Great Planet Debate." In this Activity, students will compare spacecraft images of the Earth and Jupiter and, by measuring the motion of the clouds, determine and contrast the speed of the particular weather systems shown.
Procedure Distribute copies of the images of Earth and Jupiter to your students. Begin with Earth. Ask them to identify the geographical area covered in the images and, for the first image, have them write a general description of where the atmosphere (the weather) is clear, and where it is cloudy. Next draw their attention to the second Earth image. Tell them that this image was taken 16 hours after the first image. Ask them if the general areas of clear and cloudy weather are the same. Suggest they look closely for changes.
Have them tape copies of Image #2 to a windowpane. Then carefully place Image #1 on top of it and line the pictures up. Holding the left margin of Image #2 in place, quickly cover and uncover Image #1. They will see the weather in motion.
Draw their attention to the large "comma-shaped" cloud formation over part of the eastern United States (a cold front), and have them notice, in particular, the line behind the front where clear skies are replacing cloudiness (indicated by a dashed line in the Teachers' Copy). In Image #1, have students mark 4 points along the "clearing line" (which we will call line "A") from Virginia down to Cuba and label them "A," "B," "C" and "D." Next, have them line up Image #2 on top of Image #1 and draw the position of the clearing line in Image #2 onto the clouds in Image #1. (See Teachers' Copy.) Call this line "B." Next, from points "A," "B," "C" and "D," have them draw straight lines perpendicular to line "A" until they intersect with Line "B." Mark these points of intersection "E," "F," "G" and "H." Using an atlas to measure scale, have them measure the distance between the se pairs of points and, using the elapsed time of 16 hrs. between images, calculate the average speed of the clearing line.
Jet streams are rapidly moving currents of air in a planet's atmosphere that steer and drive weather systems. Have students record the position of the jet stream from weather reports or newspapers for a few weeks and write a report on how the position and orientation of the jet stream caused the types of weather experienced during this time period.
Now call attention to the three images of Jupiter (taken by Voyager 1 in 1979.) Explain that in the first section of the Activity the students measured the speed of a cold front on Earth, relative to the ground. When we look at Jupiter, however, we see no solid surface for there is none, only the tops of clouds. In the second part of this Activity, students will measure the speed of cloud features at two different latitudes relative to the most distinctive "landmark" (sic) on the planet Jupiter's distinctive cloud feature, the Great Red Spot. In the process, students will be able to determine the speed of two of Jupiter's jet streams and compare their speeds to that of the cold front over the eastern U.S.
Explain that the images were taken on the dates and times noted. Jupiter's equator runs through the middle of each image. Jupiter's north pole runs across the top and the south pole across the bottom (thus these images are similar to Mercator map projections of Earth in that the size of features appears enlarged toward the poles).
Have the students proceed as follows:
Strip Map of Jupiter(Large GIF)
Cloud C Cloud A Cloud D Cloud B Great Red Spot
Carefully examine the two satellite images of the Earth that your teacher has given you. Briefly describe the portion of the world that they cover.
Take a look at Image #1. Write a general description of where the weather is clear and where it is cloudy.
Look at Image #2. Are the cloudy and clear areas generally the same? Do you notice some differences? This image was taken 16 hours after Image #1. By comparing the images, we can see where and how the weather has changed.
Tape Image #2 to a windowpane. Then place Image #1 on top of it and carefully line up the pictures. Next, hold Image #2 in place and tape the left margin of Image #2 in place. Holding the right margin of Image #2, quickly cover and uncover Image #1. You will see weather in motion.
Look, in particular, at the eastern portion of the United States that is shown in the images. The "comma shaped" cloud feature is a cold front and marks the leading edge of colder air advancing along the ground from west to east. We can determine how fast the front and its cold air is moving by carefully measuring the front's change in position from one image to the next, taking into account the time that elapsed between when the images were taken. Using a pencil or pen, mark four points along the curved line where the air is clearing behind the front in Image #1. (Suggestion: Start in western Virginia and move down along the clearing line from there to southern Florida or western Cuba.) From north to south, mark these points A, B C, and D.
Next, from each of the four points, draw a straight line perpendicular to the clearing line at that point.
Now, carefully examine Image #2 and see where the clearing line is in this image. Draw the position of this clearing line over the top of the comma shaped cloud in Image #1. Notice where the four straight lines you drew through points A, B, C and D cross this curved line. Mark these four points E, F, G and H (from north to south).
In the time between when the two images were recorded, point A moved to point E, point B moved to point F, and so on. To find out how fast the clearing line moved, use the distance scale to measure from point A to E, from B to F, etc., and write your answer in the spaces below.
Next calculate the average distance the clearing line moved. Do this by simply adding the four distances you measured above and dividing by 4. Write your answer below.
Average distance moved by the clearing line
Finally, determine the average speed of the clearing line. (How fast was that clear air moving in behind that cloudy front?)
You can determine the average speed at which something was moving if you know how far it traveled in a certain amount of time. Think about it. If a car travels 80 miles in 2 hours, what was its average speed? The answer is 40 miles an hours and you get the number by simply dividing the distance traveled by the time it took or 80 miles / 2 hours = 40 miles / hour.
The time between Image #1 and #2 was 16 hours. So divide the average distance you calculated above by 16 hours to get the average speed of the clearing line in miles or kilometers/hour. Write your answer here.
Distance in miles (kilometers) from :
A to E =
B to F =
C to G =
D to F =
Show students pictures or-even better-video of thunderstorm clouds billowing,
or ask them to describe in detail a thunderstorm they have experienced. Ask
them if they have ever seen a day (especially in summer) start out clear, but
become cloudy with thunderstorms by afternoon.
Explain that clouds, especially thunderstorm clouds, can frequently be created
when the
Sun heats the surface of the Earth. The surface, in turn, heats the air in
contact with it,
which begins to rise. The air cools as it rises and the moisture in it
condenses to form
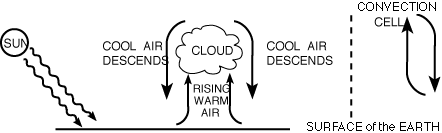
clouds. When the upward-moving air rises rapidly, it can mushroom into towering clouds
over 12 miles (app 20 kilometers) high. As the air cools, it descends back down to the
ground to be heated anew, thus setting up a cycle, or cell of air, known as a
"convection cell."
In this Activity, students will examine spacecraft images of the Earth and
Uranus to find
such huge "convection cell" clouds, and create a small convection cell in which they can see
the motion of air at different temperatures.
Materials (for every two students, or team)
Pass out copies of spacecraft images of the Earth and Uranus. Have students
briefly describe the geographical area covered in the Earth image, and identify
which areas are cloudy and which are clear. Explain that this image was taken
on July 25, 1993, and that many of the clouds they see are due to large rising
cells of warm air in the process of forming thunderstorms. Ask them to see if
they can find any thunderstorm activity over the following states: California,
western Texas, Arkansas, northern Georgia.
When they arrive at the large, white area covering Iowa, as well as portions of Nebraska,
Kansas, Missouri and Minnesota, tell them that this is a very large group of thunderstorms
known as a "Mesoscale Convective Complex," (MCC). Using a distance scale from an
atlas, have them measure its size.
Next, have them examine the HST image of Uranus. Contrast it to the image of Earth, and
have them identify the two large cloud complexes they find. Given that the diameter of
Uranus is 31,771 miles (51,120 kilometers), have them estimate the size of these cloud
features. How does the size of these convection cloud features on Uranus compare with the
one over Earth. How much of the U.S. would they cover if brought to Earth?
Part 2 Creating a Convection Cell
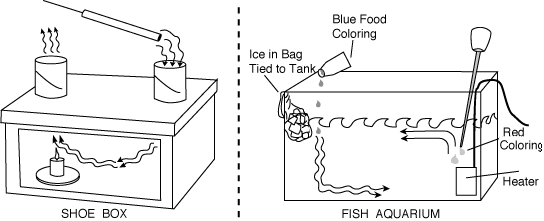
Have students cut out most of one of the
long sides of their shoe boxes and cover it with clear plastic, making a window. Have them
cut two holes in the lid just large enough for the sections of cut paper tube to fit through, as
shown in the illustration. When ready, carefully light the candles and close the lid, making
sure that the candle lies directly under one hole. Carefully place the smoking
tip of a punk,
or the smoking end of a tight curve of paper, near the top of cardboard tube #2. Smoke
introduced over the right "roof chimney" will descend since it's cool, and
travel across the length of the box to rise out of the "left chimney" because
of the rising current of warm air from the candle.
(Note: a similar activity can also be done as a demonstration using a fish
aquarium. Place room temperature water in the aquarium, filling it to about
3/4 of the way up. Place an aquarium heater at one end, and drape a plastic
bag with ice cubes into the water at the other end. Allow the water to settle,
then gently place a few drops of blue food coloring into the water near the
ice cubes, and red food coloring near the base of the heater, using a long-
nosed dropper. Within a few minutes, the food coloring will begin to trace out
the cycle of currents in the water.)
Pose the following questions to the students:
In the experiment you just completed, the candle supplied the heat causing the
air to rise.
What is the source of heat that causes air to rise and form clouds on Earth?
What is the source of heat that does the same thing on the giant planets in
our solar system like Uranus?
Go on-line and research the extensive weather-related materials which can be
found there.
The HST Home Page will provide some of the best links.
Send e-mail questions via LHST's Researcher Q&A to astronomers and scientists
who are
awaiting your inquiries!
Lead students in a discussion about weather, including how the weather is
observed, recorded and forecast. Ask them about the role weather satellites
play in allowing us to see and interpret the global weather situation every day.If possible, show a video tape of satellite images from last night's tv
weather report, and explain what the satel lite allows us
to see: weather in motion. If you get cable TV, try to include a forecast
segment that shows clouds over the entire Earth.
Ask students if they have ever seen a weather satellite image from another
planet. If they say "no," show them an image of Jupiter or Neptune taken by
the HST. Explain that as we
have continued to explore, we have reached the point where we are starting to
view and
study the weather on other worlds. Tell them that for this project they are
going to become
meteorologists working for "The Interplanetary News Network." Their job: to
issue the
first TV weather forecasts for other worlds in our solar system.
Procedure
Assign students to study TV weather reports. To ensure they (and their parents) realize this
is a serious assignment, ask them to record the channel # and call letters, name of
weathercaster and length of report. Have them list topics shown or discussed in order of
presentation: for example, Current Temperatures, Satellite Image, Weather Map,
High
Temperatures Tomorrow, Forecast, etc. What seems to be the important points
about the
weather which are covered? Did the weathercaster mention any severe weather? If so, what
kind and where? Use this list to help students think about the topics that might be covered
during a typical weathercast. Suggest students watch various channels, including the
Weather Channel, to sample different styles and content. Notice how the
weathercaster
uses each visual, and what they say about each.
Divide students into teams and assign each the task of preparing a 5-7 minute TV weather
report on a world other than Earth. Saturn's satellite, Titan and Neptune's
companion,
Triton, do have atmospheres and students may be challenged to take on some of this "moon
meteorology" as well. Explain that in the case of other planets, there have been a few
probes that have actually descended through some of their atmospheres to give a detailed
set of readings at one or two locations (Venus, and more recently Jupiter).
There have also
been extensive satellite and spacecraft images of the planets from above.
Challenge students
to read about the weather on these other worlds and prepare a team weather
report, dividing
topic and presentation responsibilities among them. One member might want to
report on
overall temperatures, while another might give a special bulletin or update on
some severe
weather ("Over to you, BobÉ Well, thanks, JaneÉ") Different students may want to act
as if they are reporting from different places on the planets, or from different levels in its
atmosphere ("I'm up here in Jupiter's clouds at about the height that the
Galileo probe
disintegrated, and let me tell you, Al...") Challenge them to make it fun but
also informative. Assist them in preparing visuals to be used in their
weathercast including
charts and slides from various sources.
Again, you can provide a checklist to help them organize their thinking:
Does your world
have a thick atmosphere or a thin one? What is the atmosphere made of? Does the
atmosphere allow us to see the surface of the planet or moon, or are there
clouds or haze in
the way? What's the surface like? What are temperatures in the upper parts of
your world's
atmosphere? At different levels in the atmosphere, or on the surface? What are
the typical
daytime highs on your world? Uniform, or different at different places?
Typical nighttime
lows? Are they different in different places?
Research the highest and lowest temperatures ever recorded in your region and
across the
Earth as a whole. How does your planet or moon compare? Does your world have
seasons? How does this affect its weather? What is the air pressure deep in the atmosphere,
or at the surface? Does the world have jet streams? How fast do they blow?
Always in the
same direction? How do these affect the weather? Is there rain, mist or fog?
What is it made
of, if not water, as on Earth? Does it snow? Is the snow made of frozen water
like snow on
Earth? Is there lightning? Are there storms? If so, what kind? Big or small
compared to
storms on Earth? Are there few, or many at one time? How long do the storms
last? How
does this compare to storms on Earth?
Ensure students have sufficient time to organize their research once they've
collected it.
Have them think about how to make it interesting and fun for others to hear and watch.
What visuals would help? What props might be useful? Prepare a script or
outline. Have
each team member practice doing their part of the weathercast, alone at first,
and then with
the others on their team. Then, when they're ready...
"The Weather on Other Worlds!"
Invite a local tv or radio meteorologist to speak about weather forecasting.
Have the students prepare questions about the science of meteorology as well
as how and why the guest speaker chose a career in this profession.
Go on-line and link from our homepage to "WeatherNet 4" to see how another
NASA - funded IITA project has helped nearly 200 schools around Washington,
DC, become real-time weather reporting stations. There are similar school-based weather networks in Houston and
elsewhere. Perhaps one of them will appeal to
you, or your Administration, as an opportunity for ongoing weathercasting, on
this planet, at least!
Return to Table of Contents.
-- Previous Section.
-- Next Section.
Activity 3C: Planetary Storms/Observing Convection Currents
Objective
To observe a fundamental motion of air responsible for certain large cloud formations on
Earth and other planets, and to report these observations.
/
Procedure
Note: this Activity can be used as a Teacher Demonstration, if there
are concerns for safety, or as a team hands-on activity for older students
Part 1 Finding and Measuring Large Cloud Features on Spacecraft Images
Activity 3D: The Interplanetary Weather Report
Objective
To compare/contrast weather on Earth and other planets in our solar
system, and prepare a weather report similar to those on local newscasts,
but interplanetary in scope.


Depending on students' backgrounds, use this Activity as an introduction to,
or an extension of, the study of meteorology. Have students research the
fundamentals of the Earth's weather including how it is measured and forecast.
Draw attention to what can be measured at localized points around the globe
(such as temperature, wind speed and
direction, types of clouds, etc.) and what is more easily seen by looking at
satellite images
of large portions of the Earth including widespread areas of cloudiness, the
location of jet
streams, etc.
Activity 3D: The Interplanetary Weather Report
Objective
To compare/contrast weather on Earth and other planets in our solar system, and prepare a
weather report similar to those on local newscasts, but interplanetary in scope.
![]()